GitHub based portfolio website
This project aims to create a website that can be hosted everywhere that mirrors personal projects on GitHub, but can be extended by additional projects without creating additional repositories for them.
Once the initial simple setup is done, you will never have to touch the webspace again. Projects are added through commits to your main repository and the content is markdown based.
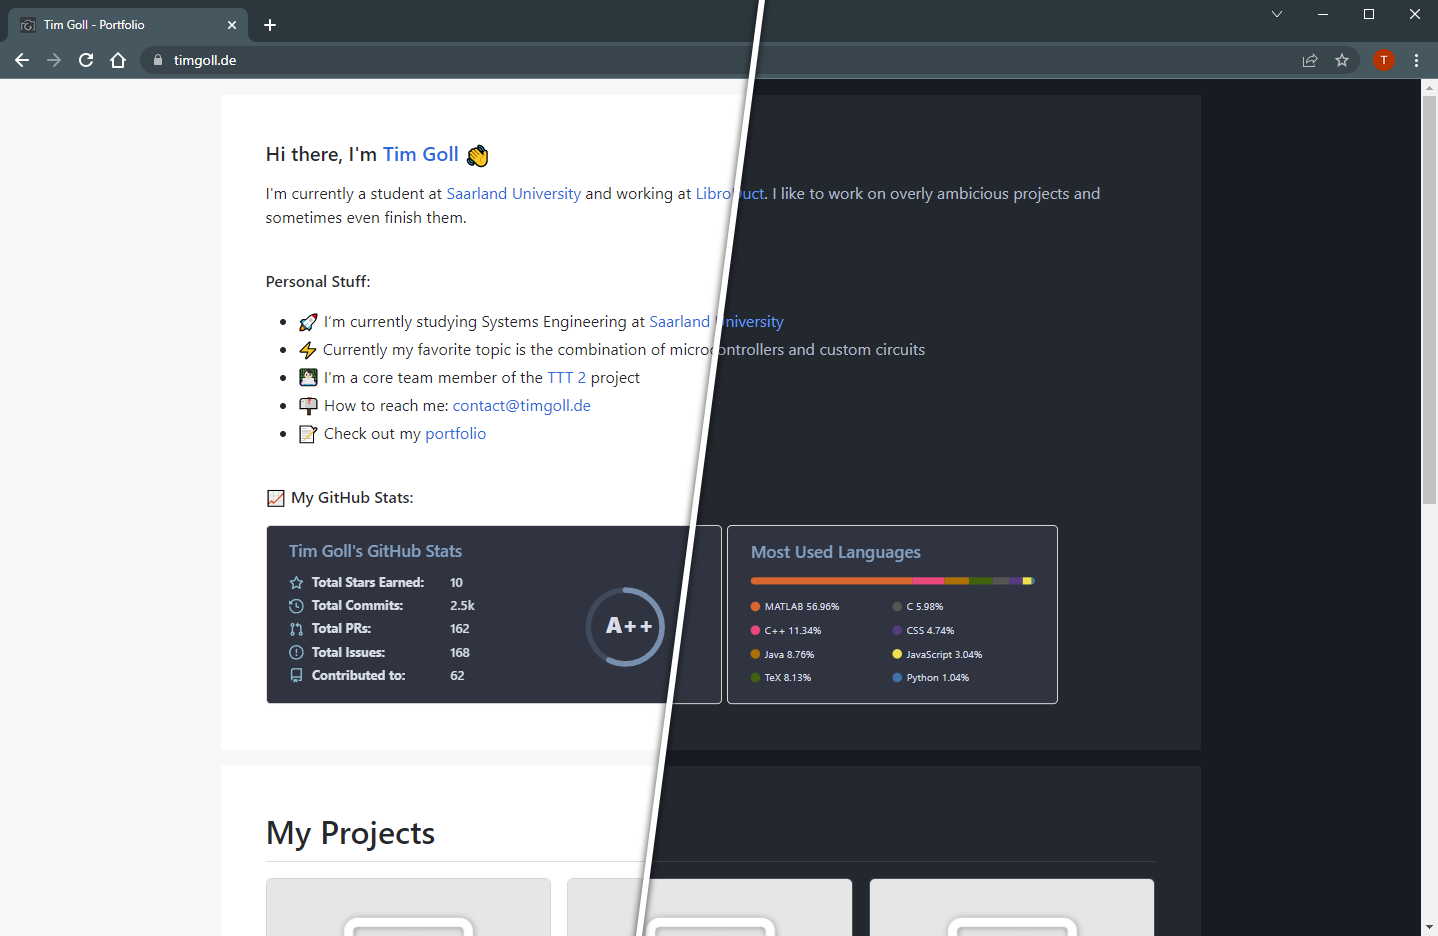
(A preview of the automatically generated website)
As can be seen on the above image, the design includes a dark and a light mode. The selection of those happens automatically based on the system preferences. Moreover the design works flawlessly with mobile devices.
Setup
For this repository and give it a fitting name. Before uploading it to your webspace, you have to edit a few files.
Config
All settings are located in a single file. Navgiate to deploy/src/php and locate the file config.php. It should look like this:
<?php
    $config = [
        "raw_base" => "https://raw.githubusercontent.com/",
        "file_base" => "https://github.com/",
        "core" => [
            "owner" => "TimGoll",
            "repository" => "github-portfolio",
            "default_branch" => "master"
        ],
        "bio" => [
            "owner" => "TimGoll",
            "repository" => "TimGoll",
            "default_branch" => "main"
        ],
        "site" => [
            "url" => "https://timgoll.de",
            "title" => "Tim Goll - Portfolio",
            "description" => "",
            "language" => "en",
            "contact" => "contact@timgoll.de",
            "copyright" => [
                "start_year" => 2014,
                "name" => "Tim Goll"
            ],
            "max_width" => "980px"
        ],
        "api_key" => "xxx",
        "rebuild_token" => ""
    ];
?>
If your project is GitHub based, the first two entries can be left unchanged. The following ones have to be changed though.
The core one should point to your fork of this repository, the bio one should point to your GitHub profile repository.
The site entries define what the website shows. The url is the public address of your website without a trailing slash, it is needed for link previews on social media and in messengers. The description is shown in search results and link previews of the landing page and can be left empty. max_width sets the width of the page content.
The landing page shows stats of the GitHub account of the bio owner (commits, pull requests and contributed repositories). They are fetched on every rebuild and need the API key. If they can't be fetched, they are simply not shown. Next to them, a "What I build" bar shows the most used topics of your projects.
The API key is optional, but should be added. GitHub limits the API to 60 calls per hour if no API key is used. A key increases that number to 5000. Such a key can be created here. You don't have to enable any of the asked permissions, as we don't want to add, remove or change repositories.
To keep the key out of git, don't put it into config.php. Instead create a file secrets.php next to it, which is ignored by git and overwrites the values from config.php:
<?php
    return [
        "api_key" => "your_key_here",
        "rebuild_token" => "a_long_random_string"
    ];
?>
Remember to upload this file to your webspace as well.
Deploying
Once the config is done, everything inside the deploy folder has to be uploaded to the root of your website folder. The webserver has to be an Apache server with mod_rewrite enabled, as the .htaccess file maps the page urls to the generated pages. Afterwards the cache has to be built once (see Automatic caching), until then a placeholder page is shown. Only the projects have to be added now.
Adding projects
Projects are defined in the projects.json file located in the webcontent/ folder.
Article types
There are three types of projects that can be defined here. They all look the same to the user, but fetch the data from a different source.
Repository readmes
The classic project is a simple link to a repository. Inside of this repository has to be a README.md file that is used as the project article.
{
    "name": "ATMega 328pb Breakout",
    "description": "A simple breakout board to test a 20MHz clocked 328pb",
    "id": "pcb_atmega328p",
    "repo_based": true
}
The name and description are used on the project box in the project view. Both should be short and fitting. The id points to the repository where this file is located. repo_based sets it to the repository based project type.
Extra markdown files
For projects that should be featured on the website but that lack their own repository, project descriptions can be added to the markdown/ folder inside of the aforementioned webcontent folder. The project files should have the same name as the id of the project.
{
    "name": "Project B",
    "desc": "Also a short expanation of what is going on",
    "id": "project_b",
    "date": "2015-12-22T00:00:00Z",
    "topics": [
        "build",
        "electronics",
        "woodworking"
    ],
    "repo_based": false
}
Overall this structure is fairly similar to the structure of the repository based project, but it has all the basic project information that is automatically fetched for GitHub based projects.
Static Pages
Static pages aren't really projects at all and are used for pages such as the lagal notice page.
{
    "name": "Legal Notice",
    "id": "legal",
    "repo_based": false,
    "hidden": true
}
The important flag here is hidden. If a project is hidden, it won't be showed in the project list.
Images for the article should be put inside of the assets/ folder which is next to the mardown/ folder.
Preview images
Preview images should be an eye catcher when scrolling through the project list. Put them inside of webcontent/assets/ and name them the same as the project id. They should be a *.png.
Automatic caching
While the whole system is GitHub based, it still caches the data on your webserver. This is done with a php script locaed in deploy/src/php/rebuild_cache.php.
The script writes finished HTML pages for the landing page and every project into deploy/src/cache/pages/, the templates for them are located in deploy/src/php/templates/. This way the website works without JavaScript and search engines and link previews see the full content, JavaScript only adds the transitions between the pages. All preview and article images are downloaded as well and served from your website, so the browsers of your visitors never have to contact GitHub.
Since rebuilding the cache deletes the old one and uses up API calls, the script can't simply be opened in the browser. It can either be run from the command line on the server:
php deploy/src/php/rebuild_cache.phpOr it can be triggered over HTTP with a POST request that contains the rebuild_token from your secrets.php (a random string can be generated with openssl rand -hex 32). All other requests are rejected with 403 Forbidden, and so is every HTTP request if no token is set.
curl -X POST -d "token=a_long_random_string" https://your-website.com/src/php/rebuild_cache.phpThe token is sent as POST data and not as a URL parameter so that it doesn't end up in server logs or the browser history.
The new cache is built in a temporary folder and only replaces the old one once everything succeeded. If anything fails, the old cache is kept and the script exits with an error message and a non-zero exit code, or 500 over HTTP. You can run this manually whenever something changed or you can automate it. Cronjobs or GitHub Actions are two systems that come to mind here.
Used External Sources
- GitHub Markdown Stylesheet: The GitHub stylesheets
- Primer Style: A few style classes are copied to my custom css file